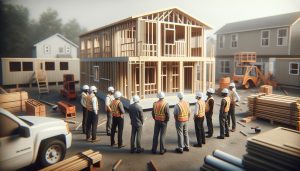
Insulating under a trailer home is crucial for maintaining a comfortable living environment, reducing energy costs, and prolonging the life of your home. Many homeowners may not realize that inadequate insulation can lead to drafts, temperature fluctuations, and higher utility bills. By investing in proper insulation techniques, you can enhance your home’s energy efficiency and provide a cozy retreat, no matter the season. Whether you’re facing cold winters or hot summers, this guide will walk you through the essential steps to effectively insulate beneath your trailer, addressing common concerns and providing practical solutions. Dive into this comprehensive foundation guide to transform your living experience and protect your investment in your mobile home.
How Insulation Benefits Your Trailer Home
Insulation is a critical factor in transforming a trailer home into a cozy, energy-efficient living space, as it significantly affects comfort, utility costs, and overall lifespan of the structure. Many trailer homeowners often underestimate the importance of proper insulation, which can lead to problems such as extreme temperature fluctuations, mold growth, and wasted energy. By investing in quality insulation beneath the trailer, residents can create a more stable environment, ensuring warmer winters and cooler summers.
One of the major benefits of insulation is energy efficiency. With proper insulation, your heating and cooling systems won’t have to work as hard to maintain a comfortable temperature. This can lead to substantial savings on utility bills, particularly in regions with extreme temperatures. Additionally, insulating beneath your trailer helps dampen sound, providing a quieter living experience by minimizing noise from outside and from plumbing or appliances inside the home.
Moreover, insulation helps to prevent moisture accumulation, which can be detrimental to both health and the integrity of the trailer. Moisture control is crucial, especially in areas prone to condensation. Insulating effectively can mitigate these risks, thereby reducing the likelihood of mold growth and structural damage. It also serves as a barrier against pests, keeping unwanted critters from making your trailer their home.
Ultimately, insulation not only enhances the comfort and efficiency of your trailer home but also protects your investment and contributes to a healthier living environment. By understanding and implementing effective insulation strategies, homeowners can enjoy the myriad of benefits associated with a well-insulated foundation.
Understanding Different Insulation Materials
When it comes to creating a comfortable living space in a trailer home, the type of insulation you choose can make all the difference. Understanding the various insulation materials available will empower you to make an informed decision that enhances energy efficiency, comfort, and longevity. Each insulation type has unique properties, advantages, and applications that can cater to different requirements and climate conditions.
Types of Insulation Materials
- Foam Board Insulation: One of the most popular choices for insulating under trailers, foam board insulation offers excellent thermal resistance and moisture control. It’s lightweight and easy to install, providing a solid barrier against heat loss. Products like blue foam board are readily available at home improvement stores and are favored for their durability and effectiveness in extreme temperatures [[3]](https://www.snowest.com/forum/threads/what-insulation-to-use-for-enclosed-trailer.43941/page-2).
- Spray Foam Insulation: Although a bit more complex to apply, spray foam insulation expands on contact, filling gaps and cracks that traditional materials might miss. It provides superior air sealing, which can prevent drafts and improve overall energy efficiency. However, it can be pricier than other options, so it’s important to weigh the benefits against your budget.
- Fiberglass Insulation: Available in batts or loose-fill, fiberglass insulation is a common choice due to its affordability and availability. It works well for soundproofing and thermal resistance, but it should be installed with care, as improper installation can lead to moisture problems and reduced effectiveness.
- Mineral Wool (Rock Wool): Known for its fire resistance and sound-dampening qualities, mineral wool is another viable option. This material can withstand higher temperatures and contribute to a safer living environment. It also has a significant resistance to moisture, making it suitable for trailers in humid climates.
Choosing the right insulation material ultimately depends on factors such as your climate, budget, and personal preferences for installation and performance. Mixing materials to leverage the strengths of each can also be a wise approach. For instance, combining foam board insulation beneath the trailer with fiberglass batts in the walls might provide the optimal balance of thermal efficiency and cost-effectiveness. This multifaceted approach ensures that you can enjoy the benefits of a well-insulated trailer home throughout the seasons.
Step-by-Step Guide to Insulating Under Your Trailer
To effectively insulate under your trailer, a systematic approach is essential for maximizing energy efficiency and comfort. Start by gathering all necessary materials, such as insulation boards or spray foam, along with safety gear, like gloves and a mask. It’s also vital to have tools on hand including a utility knife, tape measure, and a staple gun if you’re using batts or rolls of insulation.
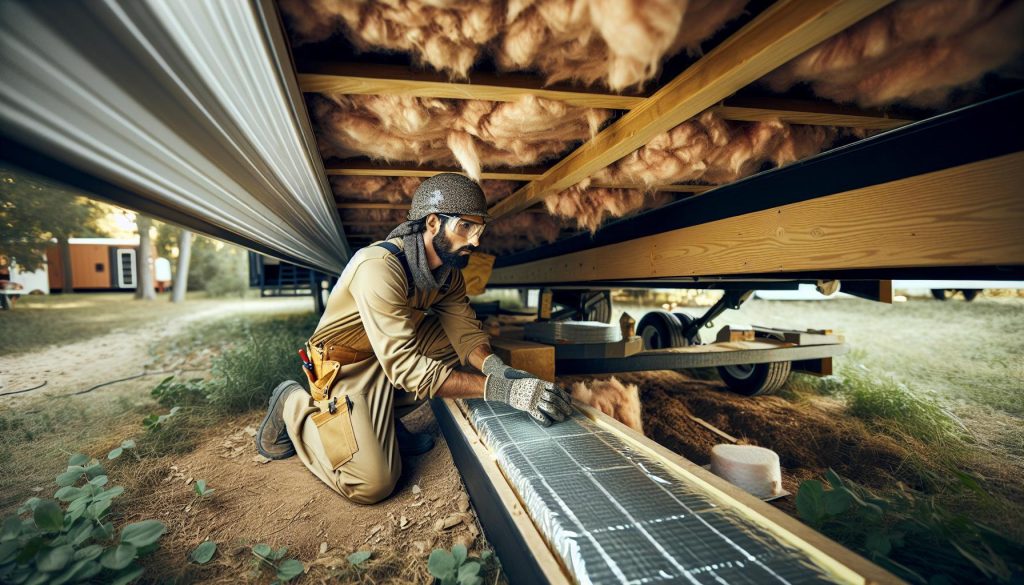
Begin by preparing the trailer’s underside. Clear away any debris or vegetation that might interfere with the insulation installation. Drainage should be checked to ensure moisture doesn’t accumulate, as dampness can compromise your insulation’s effectiveness. Next, take precise measurements of the space under the trailer; this will help you determine the quantity of insulation you’ll require.
Once the area is prepped, lay down the insulation. If using foam board, cut the material to fit snugly between the floor joists without leaving gaps. Secure it in place using construction adhesive or mechanical fasteners, ensuring a tight fit to prevent any thermal bridging. If opting for spray foam, apply it generously between the joists, allowing it to expand and fill any irregularities. This method provides excellent air sealing, preventing drafts and moisture intrusion.
Finally, cover the insulation with a moisture barrier like polyethylene sheeting. This step is crucial in preventing moisture from the ground from seeping into the insulation and ultimately your trailer home. Ensure the barrier is well-sealed at the edges and overlaps any joints to maintain its effectiveness. Regular checks will help you identify any issues, but with proper installation and maintenance, your trailer’s insulation can significantly improve your living environment, keeping it comfortable no matter the season.
Preparing Your Trailer Foundation for Insulation
To create a comfortable and energy-efficient living space under your trailer home, the foundation must be thoroughly prepared before any insulation is installed. An inadequately prepped foundation can lead to reduced insulation performance and potential moisture issues, compromising the integrity of your home. Start by ensuring that the foundation and the area underneath are in optimal condition, as this sets the stage for effective insulation.
Begin with a comprehensive cleaning of the underside of the trailer. Remove any debris, such as leaves, dirt, and accumulated items that could hinder the insulation process. This not only gives you a clear working area but also prevents potential pests from nesting in the debris. Next, examine the foundation for any signs of damage or decay, such as rotting wood or rusted metal supports. Address any structural issues immediately, as a stable foundation is essential for long-lasting insulation.
Drainage Considerations
Proper drainage is crucial in safeguarding your insulation from moisture. Inspect the ground beneath your trailer for any signs of poor drainage or pooling water, which can lead to dampness and mold growth. If necessary, consider installing a drainage system or improving existing drainage to divert water away from the trailer. This might include grading the land or incorporating gravel around the foundation to facilitate water flow.
Moisture Barrier Installation
Before laying down any insulation, consider installing a moisture barrier to keep the area dry. Use materials like polyethylene sheeting to create a barrier that prevents ground moisture from rising into the insulation. Ensure that this sheeting covers the entire area beneath the trailer, with overlaps and sealed edges to maintain its effectiveness. This step is invaluable for prolonging the life of your insulation and maintaining a dry environment under your home.
Taking these foundational steps seriously will not only enhance the effectiveness of your insulation but also contribute to a comfortable and energy-efficient living space for years to come. A well-prepared foundation can ultimately make a significant difference in your home’s temperature stability, helping you save on energy costs while promoting a healthy living environment.
Common Mistakes to Avoid When Insulating
When insulating under a trailer home, making mistakes can lead to reduced thermal effectiveness, increased energy costs, and potential structural damage. One common oversight is failing to adequately prepare the foundation. Skipping the thorough cleaning of the area can leave debris and dirt that impede the insulation installation and promote mold growth. Always clear the underside of your trailer of any materials that could create moisture pockets, risking the integrity of your insulation over time.
Another mistake is the use of inadequate insulation materials. Many homeowners underestimate the importance of choosing the right type and thickness of insulation. Quality materials, such as rigid foam board or spray foam, offer superior protection against heat loss and moisture intrusion compared to traditional fiberglass batt insulation. Additionally, ensure that the insulation fits snugly in the cavities without any gaps, as even small openings can lead to significant heat loss and air leaks.
Not considering moisture control is a critical error as well. Many people assume insulation alone will protect against dampness, but without a proper moisture barrier, water can seep into the insulation, reducing its effectiveness and leading to potential mold issues. Implementing a polyethylene moisture barrier beneath the insulation can prevent ground moisture from rising, making a significant difference in the longevity and efficiency of your insulation.
Lastly, it’s essential to plan for future access. Many homeowners insulate spaces without considering how they might need to get back in to make repairs or adjustments later. Creating accessible inspection points within the insulation or keeping an area clear can save you time and money if maintenance is required down the road. By avoiding these common pitfalls, you can ensure your trailer home remains comfortable and energy-efficient for years to come.
Maintaining Your Insulation for Long-Term Performance
Maintaining insulation effectively under your trailer home is more than just an annual inspection; it’s about fostering a long-term strategy that preserves comfort and saves costs over time. Just as a well-padded jacket protects against the chill, well-maintained insulation socks your trailer from the elements, ensuring your living space remains cozy regardless of outdoor temperatures. Regular upkeep not only prolongs the life of your insulation but also enhances the energy efficiency of your home, translating to significant savings on heating and cooling bills.
One key aspect of long-term performance is routine inspections. Make it a habit to check under your trailer every few months, especially after severe weather. Look for signs of moisture, such as damp spots or mold growth, which can indicate that your insulation is not performing as it should. If you notice any issues, address them promptly to prevent further damage. It’s also advisable to check the integrity of the vapor barrier, if installed. Any breaches in this barrier can allow moisture to infiltrate your insulation, reducing its effectiveness and leading to potential mold growth.
Implementing a seasonal maintenance routine is another effective strategy. During the fall, for instance, consider cleaning the area beneath your trailer to remove any debris that could trap moisture. In winter, ensure that your insulation is adequately packed and that there are no gaps that could allow cold air to seep in. You might also want to install or check existing ventilation, as proper airflow can help regulate temperature and moisture levels, preventing condensation build-up which can damage insulation.
Lastly, remember that the type of insulation you choose can make a significant difference in how much maintenance is required. Materials like rigid foam boards are generally more resilient and easier to maintain compared to traditional fiberglass batt insulation, which can sag and become less effective over time. When upgrading or replacing insulation, consider investing in higher-quality materials that provide better thermal resistance and moisture barriers, ensuring that your trailer remains a comfortable environment year-round.
By proactively maintaining your insulation through routine checks and seasonal tasks, you can ensure your trailer home remains a sound investment for years to come, promoting lower energy costs and a comfortable living environment.
DIY vs. Professional Insulation Installation
Choosing between DIY insulation installation and hiring a professional can significantly impact the comfort and energy efficiency of your trailer home. Each option presents its own set of advantages and challenges, making it essential to assess your skills, budget, and specific needs before making a decision.
For those with a knack for hands-on projects, DIY insulation can be rewarding both personally and financially. Installing insulation yourself allows you to tailor the project precisely to your trailer’s specifications. Here are some key benefits of a DIY approach:
- Cost Savings: You can save on labor costs by purchasing materials and doing the work yourself.
- Flexibility: DIY installations allow you to work on your schedule, tackling the project at your own pace.
- Learning Experience: Engaging in the process can help you learn valuable skills related to home maintenance.
However, there are important considerations to keep in mind. Proper insulation requires knowledge of materials, techniques, and safety measures. A poorly installed insulation system can lead to inefficient energy use, moisture problems, or structural damage. Make sure to research thoroughly and follow best practices if you choose to go the DIY route. Resources such as local home improvement stores and online tutorials can be invaluable for guidance.
On the other hand, hiring a professional can ensure the insulation is installed correctly and meets all local building codes. Here are some advantages of relying on professional services:
- Expertise: Professionals have the experience and training to identify any potential issues and know which materials will best suit your trailer.
- Quality Assurance: Many professionals offer guarantees on their work, giving you peace of mind regarding the insulation’s longevity and performance.
- Efficiency: A professional team can often complete the job more quickly, minimizing disruption to your routine.
Ultimately, the choice between DIY and professional installation comes down to personal preference and circumstances. Evaluating your confidence in handling insulation materials, your available time, and your budget will help clarify the best choice for your trailer home insulation project. Whether you choose to take on the task yourself or enlist professional assistance, ensuring effective insulation is a fundamental step in enhancing the comfort and energy efficiency of your living space.
Addressing Moisture Control Under Your Trailer
Understanding how to manage moisture under your trailer is crucial for sustaining a healthy living environment and protecting your investment. Excess moisture can lead to significant issues, including mold growth, wood rot, and structural damage, which can undermine the integrity of your trailer home. This makes it essential to implement effective moisture control strategies as part of your insulation project.
One of the most common methods to mitigate moisture is to install a proper vapor barrier. This barrier should be laid out on the ground beneath your trailer to prevent humidity from seeping into the insulation and the structure itself. Using thick plastic sheeting (minimum 6-mil) is generally recommended. Overlap the seams and ensure that it extends up the sides of your trailer’s foundation and is sealed to prevent any moisture intrusion.
Additionally, proper ventilation is vital for moisture control. If possible, incorporate vents that allow airflow beneath the trailer. Good airflow helps to keep humidity levels down and dry out any accumulated moisture. You can also consider installing exhaust fans if the trailer is situated in a particularly humid environment, as these can help circulate air and reduce moisture buildup.
Furthermore, insulating materials that resist moisture are essential. Closed-cell spray foam and rigid foam board insulations are excellent options as they provide insulation while minimizing moisture absorption. Installing them correctly involves sealing all edges and seams to prevent air leaks and moisture entry points.
By addressing moisture control proactively, you’ll enhance the longevity and comfort of your trailer home while avoiding costly repairs down the line. Taking these precautions not only protects your home but also contributes significantly to energy efficiency, maintaining a cozy interior atmosphere throughout the changing seasons.
Evaluating Costs and Budget for Insulation
Evaluating costs and budgeting for insulation under your trailer is a critical step that can significantly affect your long-term comfort and energy efficiency. Understanding the types of insulation materials available, labor costs, and potential hidden expenses can help you make informed decisions that align with your financial capabilities and home improvement goals.
The choice of insulation material greatly influences overall costs. Common options include fiberglass batts, foam board, or spray foam insulation. While fiberglass might be the most economical option upfront, closed-cell spray foam provides superior insulation and moisture resistance but requires a larger investment. Consider the long-term savings on energy bills when selecting your material; investing in higher-quality insulation can lead to lower heating and cooling costs over time. On average, homeowners can expect to pay between $0.50 to $2.00 per square foot for insulation materials, depending on the type chosen.
Additionally, assess the labor costs involved if you opt for professional installation. Hiring experts can range from $1.00 to $3.00 per square foot, based on complexity and regional pricing differences. To maximize your budget, consider whether certain tasks can be completed as DIY projects-for instance, laying fiberglass batts under the trailer may be manageable with basic tools and safety equipment. However, more complex installations, especially those involving spray foam, are better left to specialists due to the technical nature of the application.
Other factors to account for include potential modifications to the trailer’s structure or foundation. If you need to install a new vapor barrier or reinforce the skirting for adequate ventilation, there may be additional costs involved. It’s also wise to set aside a contingency fund of about 10-20% of your total insulation budget for unexpected expenses that may arise during the project.
By carefully evaluating these elements-material choices, labor costs, and potential additional expenses-you can create a detailed budget that not only covers the upfront investment but also aligns with your long-term financial strategies for maintaining a comfortable and efficient living space in your trailer home.
Energy Efficiency and Utility Savings Tips
Investing in effective insulation for your trailer home can significantly enhance energy efficiency and lead to substantial utility savings over time. Properly insulated homes maintain a stable internal temperature, reducing the need for excessive heating and cooling, which in turn lowers energy bills. By implementing a few strategic practices, you can optimize the insulation under your trailer and capitalize on these benefits.
Choose the Right Insulation Material
The choice of insulation material greatly affects energy efficiency. For instance, closed-cell spray foam offers superior thermal resistance and moisture control compared to traditional fiberglass batts. While it may have a higher upfront cost, the long-term savings on energy bills often justify the investment. Additionally, rigid foam board insulation can be placed on exterior walls, which helps to further reduce heat transfer.
Seal Gaps and Cracks
Even well-insulated trailer homes can suffer from energy loss due to gaps and cracks in the structure. Performing an audit to identify areas where air may leak-such as around windows, doors, and the skirting-can drastically improve energy efficiency. Utilize caulk or weather stripping to seal these areas. This simple maintenance task not only enhances comfort but also prevents increased costs on your utility bills.
Enhance Ventilation
While insulation is critical, maintaining proper ventilation is equally important. Good airflow reduces moisture buildup, which can lead to mold and structural damage to your trailer. Adding ventilation in the skirting allows for air circulation, particularly in humid climates. Be mindful of energy-efficient ventilation options, such as powered attic ventilators, which can help regulate temperature without consuming excessive amounts of electricity.
Monitor Temperature and Usage
Investing in a smart thermostat can provide insights into your energy usage patterns and help optimize heating and cooling schedules. By setting the thermostat to adjust automatically when you’re not home, you can avoid unnecessary energy consumption. Additionally, regularly monitoring your utility bills can reveal trends and help you identify opportunities for further savings.
Incorporating these ensures not only a more comfortable living environment but also a more sustainable and economical approach to maintaining your trailer home. With thoughtful initial investments and ongoing maintenance, you can enjoy long-lasting benefits that support both your budget and your lifestyle.
Seasonal Maintenance for Insulated Trailer Homes
Regular maintenance is essential for ensuring the longevity and efficiency of insulation in your trailer home, especially with seasonal changes that can impact both temperature and moisture levels. Each season brings specific challenges and tasks that, when addressed, can significantly enhance both comfort and energy efficiency. A proactive approach not only preserves the integrity of your insulation but also minimizes common issues such as mold growth and structural damage.
During the fall, it’s crucial to inspect insulation for any signs of wear or damage. Look for gaps where air can escape, particularly at seams, edges, and around fixtures. Sealing these areas with caulk or foam can help maintain temperature consistency and reduce energy bills. Additionally, a check for critters is important; rodents may take refuge in exposed insulation, so repairing any holes in skirting or walls can help deter them. Ensure ventilation panels are functioning correctly to prevent moisture buildup throughout the winter months.
As winter sets in, focus on maintaining a barrier against the cold. Check and replace any damaged vent covers or skirting materials to keep drafts at bay. Insulating pipes and other exposed elements under the home can prevent freezing, which is especially critical in areas prone to cold weather. If you rely on space heaters or other heating methods, ensure that they do not hinder airflow to crucial areas that require ventilation.
Spring brings the ideal time for a thorough inspection following winter weather, where melting snow can lead to moisture accumulation. Evaluate for leaks in the skirting or areas beneath the home, and address them promptly to prevent rot or mold growth in insulation materials. Washing out gutters and ensuring proper drainage away from the trailer will help manage excess water, reducing the risk of any moisture relating issues.
Finally, summer offers an opportunity to review and improve ventilation systems. Ensure that skirting has adequate airflow to combat heat build-up. It may be beneficial to install powered fans or vents if your trailer tends to retain heat excessively, thereby improving comfort levels during peak temperatures. Regularly maintaining and upgrading insulation strategies tailored to each season reinforces a safe, energy-efficient, and comfortable environment in your trailer home. Taking these steps will underline your commitment to a sustainable living choice that not only provides shelter but becomes a haven year-round.
Frequently Asked Questions About Trailer Insulation
When considering insulation for your trailer home, understanding common inquiries can lead to informed decisions that enhance your living environment. Many homeowners seek clarity on insulation types, methods, and maintenance practices to ensure their trailer remains comfortable and efficient throughout varying seasons.
What types of insulation are best for trailers?
The choice of insulation largely depends on your specific needs and the climate in your area. Common insulation materials include:
- Foam Board Insulation: This material is lightweight and offers excellent thermal resistance. It’s particularly effective when installed between studs and in crawl spaces.
- Fiberglass Batts: Widely used due to affordability and ease of installation, fiberglass batts can efficiently insulate walls and ceilings, but they may require a vapor barrier to combat moisture.
- Spray Foam Insulation: Known for its superior sealing properties, spray foam expands to fill gaps and cracks, creating an effective air barrier. While it is more expensive, it can dramatically improve energy efficiency.
- Bubble Foil Insulation: Commonly used in trailers, this reflective insulation can deflect radiant heat, making it especially useful for warmer climates or during summer months.
How do I properly insulate under my trailer?
Insulating under your trailer is crucial for preventing heat loss and minimizing moisture issues. Here’s a streamlined approach:
- Assess the Foundation: Begin by checking the condition of your trailer’s underbelly and foundation. Look for any signs of damage, leaks, or existing ventilation.
- Choose Your Insulation Material: Based on your assessment, select an appropriate insulation type.
- Install Vapor Barriers: Before installing insulation, apply a vapor barrier to prevent moisture buildup, which can lead to mold and rot.
- Secure Insulation Panels: Fit the insulation snugly between the trailer’s frame and secure it properly to prevent movement and settling over time.
- Ensure Ventilation: Maintain proper airflow by installing vents in the skirting to avoid moisture accumulation and maintain a healthy environment.
What common mistakes should I avoid when insulating my trailer?
Several pitfalls can undermine insulation efforts, including:
- Neglecting ventilation, which can lead to moisture issues.
- Overlooking damage to skirting or underbelly areas before installation.
- Using inappropriate materials that don’t suit your climate.
- Failing to seal seams and gaps effectively, allowing for drafts.
By addressing these questions, trailer homeowners can gain confidence in their insulation choices, ensuring a comfortable living space that stands the test of time and elements. Proper insulation not only enhances energy efficiency but also contributes significantly to the overall longevity and performance of your trailer home.
Faq
Q: How do I choose the right insulation material for my trailer home?
A: To choose the right insulation material for your trailer home, consider factors such as R-value, moisture resistance, and ease of installation. Materials like foam board and fiberglass batts are popular due to their high R-values and durability. Refer to the “Understanding Different Insulation Materials” section for detailed comparisons.
Q: What are the signs of poor insulation under a trailer?
A: Signs of poor insulation under a trailer include drafts, uneven heating or cooling, higher energy bills, and moisture buildup. If you notice any of these issues, it may be time to inspect and upgrade your insulation for better efficiency.
Q: Can I insulate my trailer home during winter?
A: Yes, you can insulate your trailer home during winter, but it’s essential to work quickly to avoid moisture issues. Ensure the area is dry and follow proper sealing techniques to prevent dampness, as discussed in the “Addressing Moisture Control Under Your Trailer” section.
Q: What is the average cost to insulate under a trailer home?
A: The average cost to insulate under a trailer home can vary widely, typically ranging from $1,000 to $3,000, depending on the insulation type and trailer size. Budget considerations are covered in the “Evaluating Costs and Budget for Insulation” section for more detailed insights.
Q: How can I improve ventilation under my trailer home?
A: Improving ventilation under your trailer home can prevent moisture buildup and enhance air quality. Install vent fans, ensure existing vents are clear, and use moisture barriers to promote airflow. Check the “Addressing Moisture Control Under Your Trailer” section for further tips.
Q: How often should I inspect my trailer home insulation?
A: You should inspect your trailer home insulation at least once a year, especially after severe weather changes. Regular checks can identify any damage or wear, ensuring optimal energy efficiency and comfort. Tips for seasonal maintenance are available in the “Seasonal Maintenance for Insulated Trailer Homes” section.
Q: Can I DIY trailer insulation, or should I hire a professional?
A: You can DIY trailer insulation if you’re comfortable with basic home improvement projects, but hiring a professional ensures proper installation and materials. Compare both options in the “DIY vs. Professional Insulation Installation” section for guidance on making a choice.
Q: What are the risks of improper insulation under a trailer?
A: Improper insulation under a trailer can lead to energy loss, increased utility bills, moisture issues, and potential structural damage. It’s crucial to follow best practices in insulation to maintain a safe and comfortable home environment.
Insights and Conclusions
By following the steps outlined in our “How to Insulate Under a Trailer Home: Foundation Guide,” you can significantly enhance the energy efficiency and comfort of your mobile home. Remember, proper insulation not only reduces energy costs but also prevents moisture and pest issues-critical elements for long-term satisfaction in your living space.
If you found this guide helpful, consider diving deeper into our articles on mobile home maintenance tips and understanding mobile home foundations. Don’t forget to sign up for our newsletter to receive the latest insights and resources directly to your inbox. Taking the next step-whether it’s upgrading your insulation or exploring financing options-will ensure your home remains a safe and comfortable haven. Share your thoughts in the comments below, and explore our other resources to maximize your mobile home living experience!