In the realm of recreational living, wiring your home-built trailer for RV park power can transform your outdoor adventures into comfortable getaways. Understanding how to effectively connect your trailer to a power source is crucial for a seamless experience, allowing you to power essential appliances and enjoy home-like conveniences on the road. Whether you’re a seasoned RVer or a first-time builder, navigating this electrical setup can seem daunting. However, mastering the wiring process not only empowers you to create a functional space but also enhances your confidence in DIY projects. As you read on, you’ll discover practical tips and step-by-step guidance that will demystify the wiring process, making it accessible and straightforward. Let’s dive into the essential details that will set you on the right path to enjoying all the comforts of home, no matter where you park your trailer.
Understanding RV Park Power Needs for Trailers
Understanding the power needs of your trailer while parked at an RV site is crucial for a comfortable and safe experience. Most RV parks offer two primary types of electrical connections: 30-amp and 50-amp service. Knowing which one your trailer is equipped for ensures that you can connect without complications. A 30-amp service typically provides enough power for basic amenities like lighting, a refrigerator, and a water heater, while 50-amp service is suitable for larger trailers with multiple air conditioners and other high-demand appliances.
When evaluating your trailer’s power requirements, consider the size of your appliances and devices. The combined wattage of these devices should not exceed the capacity of the service available at the RV park. For instance, if you plan to run air conditioning, heating, and other electric appliances simultaneously, a 50-amp connection is recommended. Also, familiarize yourself with the layout and accessibility of the electrical posts at the campground, as they can vary in location and type.
To maximize efficiency and minimize electrical issues, it’s advisable to equip your trailer with a surge protector. This device protects your electronics from voltage spikes that can occur with fluctuating electricity at RV parks. Understanding the park’s electricity regulations and connection protocols can significantly enhance your experience and prevent misunderstandings. Being informed and prepared not only ensures the functionality of your home-on-wheels but also boosts safety and comfort while you enjoy your mobile lifestyle.
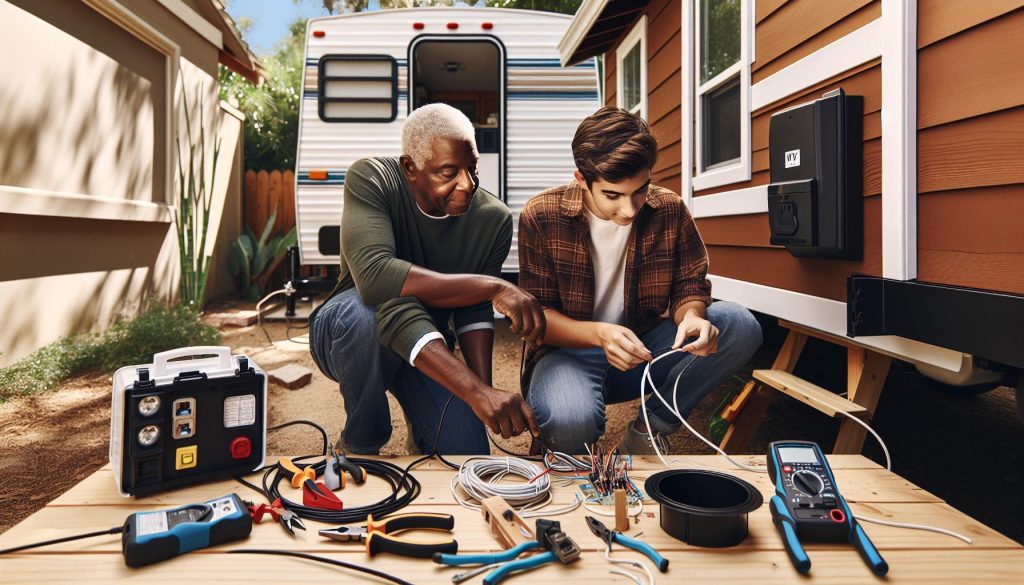
Essential Tools for Trailer Wiring Projects
To successfully wire a home-built trailer for RV park power connections, having the right tools on hand can make all the difference. Armed with the proper equipment, you can tackle wiring projects confidently and efficiently. Here’s a guide to essential tools that will empower you during the wiring process, ensuring a reliable and safe electrical setup.
Start with a sturdy, insulated toolbox that can keep your tools organized and protected. Inside, you should include:
- Wire Strippers: Essential for removing the insulation from electrical wires without damaging the metal conductor beneath.
- Cable Crimpers: Necessary for securely attaching terminals to wires, ensuring a solid connection.
- Multimeter: A crucial tool for measuring voltage, current, and resistance, allowing you to troubleshoot any electrical issues effectively.
- Screwdrivers: A set of both flat-head and Phillips screwdrivers will help you assemble and secure various components.
- Wrenches or Pliers: Useful for tightening connections and making adjustments as needed.
- Heat Shrink Tubing: Great for insulating connections after crimping; ensuring water and moisture don’t compromise your wiring.
- Voltage Tester: An essential safety tool that will help you ensure that power is off before you begin working on any electrical connections.
In addition to these tools, consider investing in a surge protector specifically designed for RVs to safeguard your trailer’s electrical system from power spikes when connecting to campground supplies. Being equipped with these basic tools not only simplifies the wiring process but also enhances your ability to perform maintenance and troubleshooting down the road. By embracing DIY wiring, you enhance your trailer’s functionality while enjoying the independence and flexibility that mobile living provides.
Step-by-Step Guide to Wiring Your Trailer
Wiring your trailer for RV park power can seem like a daunting task, but breaking it down into manageable steps makes it not only achievable but also rewarding. By understanding the process clearly, you can ensure your setup is safe and functional, enabling you to enjoy your mobile lifestyle fully. Follow this guide to get started on wiring your home-built trailer for a reliable electrical connection.
Begin by planning your wiring layout. Identify where your power sources and outlets will be located. Common locations include the main living area, kitchen, and any exterior connections for outdoor appliances. Next, gather all necessary materials, including the right gauge wiring, connectors, and other electrical components needed for your trailer’s setup. Using a wiring diagram specific to your trailer’s electrical needs can help visualize connections and prevent mistakes.
Once you have your plan, it’s time to prepare the wiring. Start by measuring the lengths needed for each run of wire, cutting them accordingly, and stripping the ends to prepare for connections. Wire strippers are essential for this process, allowing you to safely remove insulation without damaging the wire itself. After stripping, attach connectors securely, using crimpers or soldering if necessary, to ensure solid connections that can withstand vibrations during travel. Remember to follow color-coding standards for wiring to maintain consistency and prevent mishaps.
With your wiring set up, it’s crucial to establish a connection to the power source. Most RV parks provide either 30-amp or 50-amp services, so ensure that you are using the appropriate plugs and that your trailer’s system can handle the power draw safely. Install a circuit breaker box within your trailer to manage power distribution and to protect against overloads. Additional safety features, such as GFCI outlets in wet areas, can add an important layer of protection.
Finally, once everything is hooked up, conduct thorough testing. Use a multimeter to check that your connections are live and that voltage levels are correct. This step is vital to prevent any potential electrical hazards and to ensure your systems function properly. After confirming everything is operational, consider documenting your wiring setup for future reference, especially for troubleshooting or when modifications are needed. With your trailer wired correctly, you are now ready to hit the road with confidence, enjoying the freedom that comes with RV living.
Choosing the Right Electrical Components
for your home-built trailer not only ensures safety but also maximizes functionality and efficiency. With many options available, understanding the type of components best suited for your needs can simplify the wiring process significantly. For instance, the power requirements of your appliances and devices will dictate what gauges of wire and types of outlets you’ll need.
When selecting wiring, consider the following factors:
- Wire Gauge: Thicker wires can handle more current. For RV applications, 10-gauge wire is typically used for 30-amp circuits, while 6-gauge is suitable for 50-amp circuits. Always refer to the National Electrical Code (NEC) for guidance specific to your setup.
- Connectors: Use high-quality connectors that are rated for outdoor use to ensure longevity and reliability. Options like crimp connectors and heat-shrink terminals provide solid connections that resist corrosion.
- Circuit Breakers: Installing a circuit breaker box is essential. This protects your electrical system from overloads, which can lead to fires or component failure. Choose breakers that match your specific load needs.
- Outlets: GFCI outlets should be installed in areas prone to moisture, such as kitchens and bathrooms, to enhance safety. Consider using RV-specific outlets designed to handle the unique demands of mobile living.
- Power Inlets: Ensure you select the right inlet type based on RV park voltage standards, either 30-amp or 50-amp. Compatibility with park connections is crucial to avoid any power transmission issues.
Incorporating these components wisely will not only enhance your trailer’s current electrical performance but also pave the way for future upgrades or modifications. For example, if you’re planning to add solar panels or additional appliances down the line, opting for slightly larger wire gauges and a bigger circuit breaker now can save you headaches later. Always prioritize quality and compatibility over cost; investing in appropriate parts while wiring your trailer will lead to safer and more enjoyable travels.
Common Wiring Mistakes to Avoid
When tackling the complex task of wiring a home-built trailer, the difference between a successful setup and a total failure often comes down to avoiding common pitfalls. Electrical work can be daunting, and even seasoned DIY enthusiasts can make mistakes that compromise safety and functionality. Recognizing and steering clear of these errors can save time, money, and potential hazards down the road.
One of the most prevalent mistakes is improperly sizing the wire gauge. Many individuals opt for a wire that is too thin, believing it will suffice for their electrical load. Using a wire gauge not suited for the amperage can cause overheating, leading to fire risks. To prevent this, it’s crucial to refer to established guidelines, such as the National Electrical Code (NEC), which specifies wire gauges for different amperage levels. For instance, a 10-gauge wire is typically recommended for 30-amp circuits, while 6-gauge is better for 50-amp circuits.
Another frequent oversight involves neglecting to secure connections sufficiently. Whether utilizing crimp connectors or soldering, ensuring that connections are watertight and firmly attached is essential. An insecure connection can lead to intermittent power loss or short circuits. Using heat-shrink tubing or electrical tape can provide additional protection against moisture and corrosion-elements that are particularly troublesome for a trailer subjected to outdoor conditions.
Additionally, mishandling circuit breakers is a common error. Some may attempt to use a single circuit breaker for multiple circuits, which can cause overload and failure. Each circuit should have its own breaker rated for its specific load. Installing a breaker box allows for appropriate distribution and helps avoid overloading the system.
Lastly, many DIYers overlook the importance of proper labeling and organization when wiring their trailers. Failing to label wires can lead to confusion during troubleshooting or maintenance, resulting in unnecessary delays. Color-coding wires and creating a simple wiring diagram for your setup can aid in future modifications and repairs, enhancing the overall efficiency of your trailer’s electrical system.
By keeping these pitfalls in mind and approaching the wiring process with diligence and attention to detail, you can build a safe, efficient electrical system that meets the demands of RV living. Taking the time to double-check connections, use the correct materials, and avoid shortcuts in the wiring process ensures that your trailer not only meets today’s needs but is also prepared for future adjustments.
Safety Tips for Electrical Work
When working on electrical components, safety should always be your top priority. Understanding the potential hazards and taking the necessary precautions can significantly reduce the risks associated with wiring a home-built trailer. Always remember that electrical currents can be lethal, making it vital to approach your project with caution and respect for the systems involved.
Before starting any wiring project, ensure you are equipped with the appropriate personal protective equipment (PPE). This includes gloves, safety glasses, and, if necessary, insulated tools. The use of insulated tools prevents accidental shocks when working with live wires. Additionally, make sure the trailer is disconnected from any power sources to avoid any unexpected electric shocks during the wiring process. Following basic electrical safety protocols, like turning off the main power and double-checking connections, can help prevent accidents.
Understand Your Power Source
Different trailers will have varying power requirements and sources. Familiarize yourself with your travel trailer’s electrical system and the specific requirements based on the RV park’s power layout. For example, RV parks typically offer 30-amp or 50-amp service, which may lead to confusion if your trailer’s system doesn’t match this power output. Use a multimeter to confirm the voltage at your trailer’s power input, ensuring compatibility with the park’s setup before connecting. Clarity on how much power your appliances consume is crucial, as this knowledge helps prevent overloads that can result in tripped breakers or even fires.
Maintain a Clean Work Area
A cluttered workspace can lead to accidents or losing essential components. Take the time to organize your tools and materials before starting. Keeping your wiring connections and tools tidy not only promotes better efficiency but also minimizes errors. If you are multitasking, try to maintain segregation between different types of wires (like those meant for 12-volt systems versus 120-volt systems) to avoid the risk of mixing them up, potentially leading to short circuits or equipment damage.
In addition to preparing your workspace, make it a habit to label your wires clearly. Color-coding or using tags can greatly aid both the installation process and future troubleshooting. This way, if issues arise down the road, you won’t face unnecessary confusion while trying to identify which wire connects to which component.
By following these safety tips, you can navigate the complexities of wiring your home-built trailer with greater confidence and efficiency. Ensuring safety and organization at every step lays the groundwork for a reliable and functional electrical system tailored to your RV lifestyle.
Testing Your Trailer’s Electrical System
To ensure a safe and reliable electrical system in your trailer, thorough testing is essential after completing the wiring. By doing so, you can avoid potential issues that might arise during your travels. A well-functioning electrical system not only enhances your camping experience but also protects your appliances and the functionality of your entire setup.
Start by using a multimeter to test the voltage at various outlets throughout your trailer. Ensure that the voltage matches the expected readings-usually, a well-wired trailer should show around 120 volts for standard outlets. For the 12-volt systems powering lights and other appliances, check that the voltage is between 12.5 to 13.5 volts when the system is not under load. If the readings are significantly off, it may indicate a problem with your wiring, connections, or even the power supply itself.
- Testing Outlets: Go to each electrical outlet and plug in a simple appliance like a lamp or a charger. Verify that it powers on and operates normally. This will help confirm if power is flowing correctly.
- Inspecting Connections: Visually inspect your wiring to ensure that all connections are secure and insulated as needed. Look for any signs of wear, corrosion, or loose connections that could lead to short circuits or equipment failure.
- Grounding Checks: Ensure that all grounding connections are correct. A poor ground can lead to safety hazards and operational issues, particularly with sensitive electronics.
When testing your electrical system, it’s also a good idea to operate all appliances one by one while monitoring the electrical load. This practice helps ensure that the system can handle the power draw without tripping breakers or causing voltage drops. Additionally, if your trailer is equipped with a generator or is connected to an RV park’s electrical outlet, monitor the performance under load to ensure stability and reliability when you’re away from home.
After testing, if you encounter issues such as fluctuating voltage or appliances not working as expected, revisit your wiring and check for common mistakes. Ensure all wires are connected securely and that there are no exposed or frayed wires. Taking the time to thoroughly test your trailer’s electrical system before embarking on a journey will provide peace of mind and ensure that your home away from home remains functional and enjoyable.
RV Park Power Connection Protocols
When connecting your home-built trailer to RV park power, understanding the protocols is essential for both convenience and safety. Most RV parks provide power through a series of pedestals equipped with standard electrical hookups, typically offering both 30-amp and 50-amp service. Knowing how to navigate these options can enhance your camping experience and ensure your trailer’s systems run smoothly.
First, ascertain the type of power your trailer is equipped to handle. A standard 30-amp service supports most smaller trailers and provides 120 volts, whereas a 50-amp service is ideal for larger units or those requiring more power, delivering up to 240 volts. When arriving at an RV park, locate the electrical pedestal, and verify that the service amperage matches your trailer’s requirements. If your road-ready setup can accommodate both, merely choose the appropriate receptacle for your connection.
Always ensure your trailer’s power cord is in good condition before plugging into any RV park electrical supply. Inspect for cracks, fraying, or any signs of wear that could lead to electrical faults. Additionally, it’s advisable to use a surge protector to guard against voltage spikes that can damage your appliances. Many RV parks also require you to use a specific type of adapter or extension if your power needs don’t directly match those available at the pedestal, so checking in advance can save a lot of hassle.
Make a habit of following the park’s check-in protocols. Management may provide you with guidelines or restrictions about power usage to prevent overloading the shared system, especially during peak usage times. Some parks may even have specific quiet hours where power consumption is monitored. Familiarize yourself with campground policies, and be considerate of your neighbors by managing your power use effectively, ensuring everyone can enjoy their stay without disruptions.
In conclusion, connecting to RV park power requires attentiveness to both the technical specifications of your trailer and the operational guidelines of the campground. By taking the necessary precautions and understanding the available services, you can enjoy a seamless and enjoyable experience while on the road.
Maintaining Your Trailer’s Electrical System
Maintaining the electrical system of your trailer is pivotal for both safety and functionality, especially when connecting to RV park power. Regular upkeep ensures that your electrical setup continues to meet your needs without unexpected failures. This involves not only routine inspections but also understanding the components that make your system operate smoothly.
Start by performing visual inspections of your wiring and connections at least twice a year, paying particular attention to areas exposed to moisture or extreme temperatures. Look for signs of wear such as fraying wires, corrosion on connectors, or any burnt marks around outlets. Addressing these issues promptly can prevent more significant problems down the road. Ensure that all connections are tight and free from debris, dust, or moisture, which can lead to electrical shorts or diminished performance.
Another critical aspect of maintenance is testing your trailer’s electrical system periodically. Using a multimeter, check voltage levels to ensure they are within the appropriate range for your system; this is particularly important after extended periods without use. Regular testing will help you catch potential issues before they escalate. Consider keeping a record of your tests to identify any patterns that may signal wiring problems or the need for upgrades.
You should also focus on the health of your batteries. Regularly check for any corrosion on battery terminals and ensure that your batteries maintain a full charge. Depending on the type of battery, maintenance might involve topping off distilled water or cleaning terminals. Keeping your power source in good condition contributes to the reliability of your entire electrical system.
Lastly, investing in quality surge protectors can significantly extend the life of your electrical components. These devices shield your appliances from voltage spikes when plugging into RV park power, safeguarding against damage. This small step is effective in providing peace of mind as you enjoy the benefits of RV living, knowing that your electrical system is well-maintained and secure.
By embracing these straightforward maintenance practices, you will ensure that your trailer’s electrical system remains efficient and safe, enabling you to enjoy your travels without the worry of electrical mishaps.
Upgrading Your Trailer’s Electrical Setup
Upgrading the electrical setup of your trailer can dramatically enhance your camping experience, make your travels more convenient, and ensure your appliances run efficiently. With a growing number of RV parks offering varied power solutions, ensuring you’re equipped for optimal performance is essential. Whether you’re relying on solar power, shore power connections, or a generator, understanding how to upgrade and tailor your electrical system can elevate your mobile living experience.
One of the first considerations when upgrading is to ensure that you have the right capacity for your needs. Adding lithium batteries, for example, can significantly improve efficiency and charging speed compared to traditional lead-acid batteries. Modern lithium setups, like a 600Ah battery bank, not only provide reliability but also reduce weight, allowing for better maneuverability and fuel efficiency while towing. Additionally, integrating advanced chargers and inverters, like a Multiplus system, can optimize energy management by seamlessly transitioning between different power sources.
As you plan your upgrades, it’s critical to replace or reinforce wiring that supports increased loads. Many trailers are designed with minimal wiring to keep costs down, meaning that you might need to upgrade your gauge size to accommodate higher amperage. Standardizing your electrical system with high-quality circuits and connectors can also guard against potential failures or damaged appliances due to inadequate wiring.
Common Electrical Upgrades to Consider
- Solar Panels: Adding solar panels allows for off-grid capabilities and can substantially reduce reliance on traditional power sources.
- Inverter Installations: Inverters convert DC battery power to AC, enabling the use of household appliances and increasing comfort.
- Advanced Battery Management Systems: These systems optimize battery health, improving lifespan and performance through intelligent management of charging and discharging cycles.
- Surge Protection Devices: Protect your devices from sudden voltage spikes when connecting to external power sources.
When executing upgrades, utilize a step-by-step method to ensure everything is installed correctly and safely. Begin by assessing your existing system and identifying bottlenecks or areas needing enhancement. Always prioritize safety: disconnect your batteries during installations and utilize proper tools and PPE. This approach not only maximizes the lifespan of your trailer’s electrical system but also creates a reliable setup that supports your lifestyle on the road.
By taking these steps, you can ensure your trailer is equipped for modern living, allowing you to fully embrace the freedom and flexibility that mobile lifestyles offer.
Troubleshooting Common Electrical Issues
Electrical issues in your home-built trailer can turn a planned adventure into a frustrating ordeal. Whether you’re dealing with flickering lights, non-functional outlets, or a noisy inverter, understanding common electrical problems can save you time and hassle. Most issues stem from three primary sources: faulty connections, inadequate wiring, or component failures. A systematic approach to troubleshooting will help you identify and resolve these issues efficiently.
Start by systematically checking all connections. Ensure that everything is properly plugged in and that there are no loose wires. Look for corrosion on terminals and connections, which can interfere with electrical flow. If you notice frayed or damaged wires, replace them immediately to prevent further complications or fire hazards. When dealing with RV park power connections, confirm that the park’s electrical service is functioning properly and not overloaded.
Another common concern is inadequate wiring, which can occur if the original design didn’t account for the demands of modern appliances. If you find that your lights dim when you turn on the refrigerator, your system may be struggling to support the load. Upgrading your wiring to the appropriate gauge can help accommodate higher amperage needs and prevent overheating. Always verify that your circuit breakers or fuses are functioning correctly and replace any that have blown to restore power safely.
In cases where you experience erratic operation, particularly with inverters or battery management systems, consider the functionality of those components. A malfunctioning inverter can lead to unreliable power supply to your AC devices. If you suspect a component failure, consulting the manufacturer’s manual or seeking professional assistance can expedite repairs. Documentation often includes valuable troubleshooting steps tailored to specific models, ensuring you’re following the right procedures.
By remaining vigilant about potential electrical issues and adhering to a thorough troubleshooting process, you can enjoy your home-built trailer to its fullest. Empower yourself with knowledge, conduct regular system checks, and embrace mobile living with confidence, knowing that solutions are within reach.
Enhancing Trailer Power Efficiency
Making efficient use of power in your home-built trailer not only enhances comfort but can also significantly reduce operating costs. By understanding how to optimize your electrical system, you can extend battery life, minimize load on your inverter, and prevent overloads when plugged into RV park power sources. Adopting a few practical strategies can lead to greater efficiency and a more enjoyable mobile living experience.
One of the most effective ways to increase power efficiency is by investing in energy-efficient appliances. Look for devices that are rated for low power consumption. For instance, using LED lights instead of incandescent bulbs can reduce lighting power needs by up to 80%. Similarly, ENERGY STAR rated appliances consume less electricity, which can positively impact both your battery life and campground electricity usage.
Proper insulation also plays a vital role in efficiency. By insulating your trailer effectively, you can reduce the need for heating and cooling systems, which are often the largest energy consumers. Focus on using high-quality materials, especially around windows and doors, to prevent heat loss during colder months or excess heat gain in warmer climates. This not only makes your trailer more comfortable but also conserves energy.
Maintenance of your electrical system is equally important. Regularly check and clean all connections and components, such as battery terminals and inverters, to ensure optimal performance. Corrosion can inhibit electrical flow, leading to wasted energy. Consider investing in a power monitor to gauge your usage and identify any spikes or unusual consumption patterns-this can help you quickly pinpoint issues before they become costly problems.
Lastly, utilizing alternative energy sources-like solar panels-can dramatically improve your trailer’s efficiency. By outfitting your trailer with solar panels, you can harness renewable energy to power your devices and appliances, reducing reliance on campground power supplies and diminishing your overall emissions.
- Energy-efficient appliances: Opt for low-power consumption options.
- Insulation: Insulate windows and doors effectively to minimize heating/cooling needs.
- Regular maintenance: Keep all connections clean and check for corrosion.
- Alternative energy sources: Consider solar panels to supplement your power supply.
Adopting these strategies will not only make your trailer more efficient but will also enhance your overall mobile living experience, allowing you to focus more on enjoying your adventures and less on power management.
Q&A
Q: How do I determine the right amperage for my trailer’s power needs?
A: To determine the right amperage for your trailer, calculate the total wattage of all electrical devices you plan to use. Divide this by the voltage (typically 120V in RV parks) to find the required amperage. This ensures your wiring can safely handle the load without overheating.
Q: What type of wiring is best for an RV trailer?
A: For RV trailers, it is advisable to use RV-grade wiring, specifically stranded copper wire, which offers flexibility and conductivity. Use 10-12 gauge wire for high-demand circuits like air conditioning and 14-16 gauge wire for lights and lower-power devices.
Q: Can I use extension cords for my trailer’s electrical setup?
A: While it may be tempting, using extension cords is not recommended for permanent wiring in trailers. They are not designed for long-term use and may pose safety hazards. Instead, install dedicated wiring to ensure a safe and reliable electrical system.
Q: What is the best way to protect my trailer’s electrical wiring from damage?
A: To protect your trailer’s electrical wiring, use conduit and wire loom to shield wires from physical damage and environmental factors. Additionally, regularly inspect and maintain your wiring to catch any wear or damage early.
Q: How do I safely connect my trailer to a power source at an RV park?
A: To safely connect your trailer to an RV park power source, use a certified power adapter compatible with park outlets. Always ensure that the park’s voltage matches your trailer’s requirements, and make sure all connections are secure to prevent arcing.
Q: What should I do if my trailer experiences power surges?
A: If your trailer experiences power surges, install a surge protector designed for RVs. This device will protect your electrical system from spikes and provide peace of mind. Also, consider checking your park’s electrical system to ensure it’s stable.
Q: Why is it important to label my trailer’s electrical circuits?
A: Labeling your trailer’s electrical circuits is important for easy troubleshooting and maintenance. It helps identify which circuit powers specific devices, allowing for quick isolation of problems and ensuring safe operation during repairs.
Q: How often should I inspect my trailer’s electrical system?
A: You should inspect your trailer’s electrical system at least once a year, or more frequently if you use it often. Regular inspections help catch potential issues early, ensuring safety and efficiency in your electrical setup.
Insights and Conclusions
Congratulations on mastering the basics of wiring your home-built trailer for RV park power! With the right tools and techniques, you’re well on your way to enjoying comfortable, reliable power on your next adventure. If you have lingering questions or want to dive deeper, check out our articles on essential RV maintenance tips and trailer setup best practices.
Don’t forget to sign up for our newsletter for expert advice delivered straight to your inbox, ensuring you’re well-prepared for all your mobile home and RV needs. As you continue to enhance your RV experience, remember that the key to happiness on the road is knowledge, so keep exploring our resources. We’d love to hear your thoughts or any challenges you face-drop a comment below and join our community of mobile home enthusiasts!